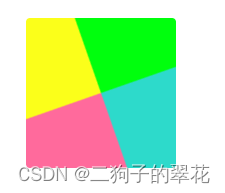
一、背景流动边框

实现原理:
用背景进行旋转,超出我们想显示的范围则hidden,就有以上的效果,可以用after或者before元素来实现也可以。
<!DOCTYPE html>
<html lang="en">

<head>
    <meta charset="UTF-8">
    <meta name="viewport" content="width=device-width, initial-scale=1.0">
    <title>Document</title>
    <style>
        .box {
            position: relative;
            width: 150px;
            height: 150px;
            margin: 100px auto;
            overflow: hidden;
            border-radius: 4px;
        }
        @keyframes rotate {
            to {
                transform: rotate(1turn);
            }
        }
        .under {
            position: relative;
            width: 0px;
            height: 0px;
            border-top: 200px solid yellow;
            border-right: 200px solid green;
            border-bottom: 200px solid red;
            border-left: 200px solid blueviolet;
            left: -125px;
            top: -125px;
            animation: rotate 2s linear infinite;
        }
        .box > span {
            position: absolute;
            top: 0px;
            margin: 8px;
            width: 134px;
            height: 134px;
            border-radius: 4px;
            background-size: cover;
            background-image: url(https://img-blog.csdnimg.cn/20201011132854978.jpg);
            background-color: white;
        }
        @keyframes rotate2 {
            0%{
                transform: rotate(0turn);
            }
            to {
                transform: rotate(-1turn);
            }
        }
        .box .under2 {
            position: relative;
            width: 0px;
            height: 0px;
            border-top: 200px solid rgb(0, 255, 13);
            border-right: 200px solid rgb(45, 218, 203);
            border-bottom: 200px solid rgb(255, 106, 156);
            border-left: 200px solid rgb(251, 255, 26);
            left: -125px;
            top: -125px;
            animation: rotate2 2s linear infinite;
        }
    </style>
</head>

<body>
    <div class="box">
        <div class="under"></div>
        <span></span>
    </div>
    <div class="box">
        <div class="under2"></div>
        <span></span>
    </div>
</body>

</html>
二、跟随鼠标流动边框效果

<!DOCTYPE html>
<html lang="en">

<head>
    <meta charset="UTF-8">
    <meta name="viewport" content="width=device-width, initial-scale=1.0">
    <title>Document</title>

    <style>
        :root {
            --bg: hsl(246 44% 7%);
            --border: hsl(280 10% 50% / 1);
            --card: hsl(237 36% 10%);
            --color: hsl(240 18% 80%);
            --border-width: 2px;
            --border-radius: 12px;
            --gradient: conic-gradient(from 180deg at 50% 70%, hsla(0, 0%, 98%, 1) 0deg, #eec32d 72.0000010728836deg, #ec4b4b 144.0000021457672deg, #709ab9 216.00000858306885deg, #4dffbf 288.0000042915344deg, hsla(0, 0%, 98%, 1) 1turn);
        }

        *,
        *:after,
        *:before {
            box-sizing: border-box;
        }

        @property --start {
            syntax: '<number>';
            inherits: true;
            initial-value: 0;
        }

        body {
            background: var(--bg);
            display: grid;
            place-items: center;
            min-height: 100vh;
            font-family: "Geist Sans", "SF Pro Text", "SF Pro Icons", "AOS Icons", "Helvetica Neue", Helvetica, Arial, sans-serif, system-ui;
            font-weight: 70;
            color: var(--color);
        }

        .container {
            --spread: 60;
            display: flex;
            flex-wrap: wrap;
            flex-direction: var(--direction);
            gap: calc(var(--gap) * 1px);
            margin: 0 auto;
            justify-content: center;
            place-items: center;
            position: relative;
            padding: 2rem;
            touch-action: none;
        }

        article {
            --active: 0.15;
            --start: 0;
            height: 100%;
            background: var(--card);
            padding: 4rem;
            aspect-ratio: 330 / 400;
            border-radius: var(--border-radius);
            min-width: 280px;
            max-width: 280px;
            display: flex;
            flex-direction: column;
            gap: 0.25rem;
            position: relative;
        }

        article:is(:hover, :focus-visible) {
            z-index: 2;
        }

        .glows {
            pointer-events: none;
            position: absolute;
            inset: 0;
            filter: blur(calc(var(--blur) * 1px));
        }

        .glows::after,
        .glows::before {
            --alpha: 0;
            content: "";
            background: var(--gradient);
            background-attachment: fixed;
            position: absolute;
            inset: -5px;
            border: 10px solid transparent;
            border-radius: var(--border-radius);
            mask:
                linear-gradient(#0000, #0000),
                conic-gradient(from calc((var(--start) - (var(--spread) * 0.5)) * 1deg), #000 0deg, #fff, #0000 calc(var(--spread) * 1deg));
            mask-composite: intersect;
            mask-clip: padding-box, border-box;
            opacity: var(--active);
            transition: opacity 1s;
        }


        article::before {
            position: absolute;
            inset: 0;
            border: var(--border-width) solid transparent;
            content: "";
            border-radius: var(--border-radius);
            pointer-events: none;
            background: var(--border);
            background-attachment: fixed;
            border-radius: var(--border-radius);
            mask:
                linear-gradient(#0000, #0000),
                conic-gradient(from calc(((var(--start) + (var(--spread) * 0.25)) - (var(--spread) * 1.5)) * 1deg),
                    hsl(0 0% 100% / 0.15) 0deg,
                    white,
                    hsl(0 0% 100% / 0.15) calc(var(--spread) * 2.5deg));
            mask-clip: padding-box, border-box;
            mask-composite: intersect;
            opacity: var(--active);
            transition: opacity 1s;
        }

        article::after {
            --bg-size: 100%;
            content: "";
            pointer-events: none;
            position: absolute;
            background: var(--gradient);
            background-attachment: fixed;
            border-radius: var(--border-radius);
            opacity: var(--active, 0);
            transition: opacity 1s;
            --alpha: 0;
            inset: 0;
            border: var(--border-width) solid transparent;
            mask:
                linear-gradient(#0000, #0000),
                conic-gradient(from calc(((var(--start) + (var(--spread) * 0.25)) - (var(--spread) * 0.5)) * 1deg), #0000 0deg, #fff, #0000 calc(var(--spread) * 0.5deg));
            filter: brightness(1.5);
            mask-clip: padding-box, border-box;
            mask-composite: intersect;
        }

        .badge {
            border: 2px solid var(--border);
            align-self: start;
            border-radius: 100px;
            padding: 0.5rem 0.7rem;
            font-size: 0.675rem;
            display: flex;
            align-items: center;
            gap: 0.25rem;
            font-weight: 50;
        }

        a {
            color: var(--color);
            text-decoration: none;
            opacity: 0.5;
            display: inline-block;
            align-self: start;
            transition: opacity 0.2s;
        }

        a:is(:hover, :focus-visible) {
            opacity: 1;
        }

        article h2 {
            margin: 0;
            padding: 1rem 0;
            font-weight: 100;
            font-size: 1.5rem;
        }

        .header {
            position: relative;
            flex: 1;
            display: flex;
            align-items: center;
        }

        .header svg {
            --count: 4;
            width: 106px;
        }

        .header svg:nth-of-type(2),
        .header svg:nth-of-type(3),
        .header svg:nth-of-type(4) {
            position: absolute;
            z-index: calc(var(--count) - var(--index));
            translate: calc(var(--index) * 30%) 0;
            opacity: calc(var(--count) / (2 * (var(--index) * 10)));
        }

        .header svg:nth-of-type(2) {
            --index: 1;
        }

        .header svg:nth-of-type(3) {
            --index: 2;
        }

        .header svg:nth-of-type(4) {
            --index: 3;
        }

        .badge svg {
            width: 16px;
        }

        .dg.ac {
            z-index: 99999 !important;
        }
    </style>
</head>

<body>
    <div class="container" style="--gap:32;--blur:20;--spread:80;--direction:'column'">
        <article>
            <div class="glows"></div>

        </article>
        <article >
            <div class="glows" ></div>

        </article>
    </div>

    <script>
        const CONTAINER = document.querySelector('.container')
        const CARDS = document.querySelectorAll('article')

        const CONFIG = {
            proximity: 40,
            spread: 80,
            blur: 20,
            gap: 32,
            vertical: false,
            opacity: 0,
        }

        const PROXIMITY = 10

        const UPDATE = (event) => {
            // get the angle based on the center point of the card and pointer position
            for (const CARD of CARDS) {
                // Check the card against the proximity and then start updating
                const CARD_BOUNDS = CARD.getBoundingClientRect()
                // Get distance between pointer and outerbounds of card
                if (
                    event?.x > CARD_BOUNDS.left - CONFIG.proximity &&
                    event?.x < CARD_BOUNDS.left + CARD_BOUNDS.width + CONFIG.proximity &&
                    event?.y > CARD_BOUNDS.top - CONFIG.proximity &&
                    event?.y < CARD_BOUNDS.top + CARD_BOUNDS.height + CONFIG.proximity) {
                    // If within proximity set the active opacity
                    CARD.style.setProperty('--active', 1)
                } else {
                    CARD.style.setProperty('--active', CONFIG.opacity)
                }
                const CARD_CENTER = [
                    CARD_BOUNDS.left + CARD_BOUNDS.width * 0.5,
                    CARD_BOUNDS.top + CARD_BOUNDS.height * 0.5
                ]
                let ANGLE = Math.atan2(event?.y - CARD_CENTER[1], event?.x - CARD_CENTER[0]) * 180 / Math.PI
                ANGLE = ANGLE < 0 ? ANGLE + 360 : ANGLE;
                CARD.style.setProperty('--start', ANGLE + 90)
            }

        }

        document.body.addEventListener('pointermove', UPDATE)

        const RESTYLE = () => {
            CONTAINER.style.setProperty('--gap', CONFIG.gap)
            CONTAINER.style.setProperty('--blur', CONFIG.blur)
            CONTAINER.style.setProperty('--spread', CONFIG.spread)
            CONTAINER.style.setProperty('--direction', CONFIG.vertical ? 'column' : 'row')
        }


        RESTYLE()
        UPDATE()
    </script>
</body>

</html>
三、利用clip-path实现流动边框效果
四边:

两边:
<!DOCTYPE html>
<html lang="en">

<head>
    <meta charset="UTF-8">
    <meta name="viewport" content="width=device-width, initial-scale=1.0">
    <title>Document</title>
    <style>
        body {
            background-color: black;
            display: flex;
            justify-content: center;
            align-items: center;
            height: 100vh;
        }

        .box {
            height: 150px;
            width: 150px;
            position: relative;
            border-radius: 10px;
            display: flex;
            justify-content: center;
            align-items: center;
            background-image: linear-gradient(45deg, gold, deeppink);
            /* animation: hue 3s infinite linear; */

            /* &::before,
            &::after {
                content: "";
                position: absolute;
                top: -15px;
                bottom: -15px;
                left: -15px;
                right: -15px;
                border: 5px solid #24acf2;
                border-image: linear-gradient(45deg, gold, deeppink) 1;
                clip-path: inset(0px round 10px);
                animation: clippath 3s infinite linear;
            }

            &::after {
                animation: clippath 3s infinite -1.5s linear;
            }

            span {
                color: white;
                font-size: 20px;
            } */
        }

        .line {
            position: absolute;
            top: -15px;
            bottom: -15px;
            left: -15px;
            right: -15px;
            border: 5px solid #24acf2;
            border-image: linear-gradient(45deg, gold, blue, deeppink) 1;
            /* clip-path: inset(0px round 10px); */
            animation: clippath 8s infinite linear;
            filter: blur(50px);
            animation-delay: -0s;
            box-shadow: 0 0 3px inset rgba(247, 214, 1,0.3);
        }

        .line-2 {
            animation-delay: -2s;
            animation: clippath2 8s infinite -2s linear;

        }

        .line-3 {
            animation-delay: -4s;
        }

        .line-4 {
            animation-delay: -6s;
            animation: clippath2 8s infinite -6s linear;

        }
        /* .line-2,.line-4{
            top: -20px;
            bottom: -20px;
            left: -20px;
            right: -20px;
        } */

        @keyframes hue {
            0% {
                filter: hue-rotate(0deg);
            }

            100% {
                filter: hue-rotate(360deg);
            }
        }

        @keyframes clippath {
            0% {
                clip-path: inset(0 0 95% 0);
                filter: hue-rotate(0deg) blur(5px);
            }

            25% {
                clip-path: inset(0 95% 0 0);
            }

            50% {
                clip-path: inset(95% 0 0 0);
            }

            75% {
                clip-path: inset(0 0 0 95%);
            }

            100% {
                clip-path: inset(0 0 95% 0);
                filter: hue-rotate(360deg) blur(5px);
            }
        }

        @keyframes clippath2 {
            0% {
                clip-path: inset(0 0 95% 0);
                filter: hue-rotate(0deg) blur(10px);
            }

            25% {
                clip-path: inset(0 95% 0 0);
            }

            50% {
                clip-path: inset(95% 0 0 0);
            }

            75% {
                clip-path: inset(0 0 0 95%);
            }

            100% {
                clip-path: inset(0 0 95% 0);
                filter: hue-rotate(360deg) blur(10px);
            }
        }
    </style>
</head>

<body>
    <div class="box">

        <div class="line-1 line"></div>
        <!-- <div class="line-2 line"></div> -->
        <div class="line-3 line"></div>
        <!-- <div class="line-4 line"></div> -->
        <span>hello world</span>
    </div>
</body>

</html>
四、
<button>
	<div>
		A beautiful button
	</div>
</button>

@property --border-angle-1 {
	syntax: "<angle>";
	inherits: true;
	initial-value: 0deg;
}

@property --border-angle-2 {
	syntax: "<angle>";
	inherits: true;
	initial-value: 90deg;
}

@property --border-angle-3 {
	syntax: "<angle>";
	inherits: true;
	initial-value: 180deg;
}


/* sRGB color. */
:root {
	--bright-blue: rgb(0, 100, 255);
	--bright-green: rgb(0, 255, 0);
	--bright-red: rgb(255, 0, 0);
	--background: black;
	--foreground: white;
	--border-size: 2px;
	--border-radius: 0.75em;
}

/* Display-P3 color, when supported. */
@supports (color: color(display-p3 1 1 1)) {
	:root {
		--bright-blue: color(display-p3 0 0.2 1);
		--bright-green: color(display-p3 0.4 1 0);
		--bright-red: color(display-p3 1 0 0);
	}
}

@keyframes rotateBackground {
	to { --border-angle-1: 360deg; }
}

@keyframes rotateBackground2 {
	to { --border-angle-2: -270deg; }
}

@keyframes rotateBackground3 {
	to { --border-angle-3: 540deg; }
}

body {
	background: var(--background);
	color: var(--foreground);
	min-height: 100dvh;
	display: grid;
	place-content: center;
	margin: 0;
	font-family: "Aspekta";
}

button {
	--border-angle-1: 0deg;
	--border-angle-2: 90deg;
	--border-angle-3: 180deg;
	color: inherit;
	font-size: calc(0.8rem + 4vmin);
	font-family: inherit;
	border: 0;
	padding: var(--border-size);
	display: flex;
	width: max-content;
	border-radius: var(--border-radius);
	background-color: transparent;
	background-image: conic-gradient(
			from var(--border-angle-1) at 10% 15%,
			transparent,
			var(--bright-blue) 10%,
			transparent 30%,
			transparent
		),
		conic-gradient(
			from var(--border-angle-2) at 70% 60%,
			transparent,
			var(--bright-green) 10%,
			transparent 60%,
			transparent
		),
		conic-gradient(
			from var(--border-angle-3) at 50% 20%,
			transparent,
			var(--bright-red) 10%,
			transparent 50%,
			transparent
		);
	animation:
		rotateBackground 3s linear infinite,
		rotateBackground2 8s linear infinite,
		rotateBackground3 13s linear infinite;
}

/* Change this background to transparent to see how the gradient works */
button div {
	background: var(--background);
	padding: 1em 1.5em;
	border-radius: calc(var(--border-radius) - var(--border-size));
	color: var(--foreground);
}